
はじめに
CoreData手習い今日もこつこつその4です。
データの読み込みと同じく順番に準備していきましょう。

コンテキストを取得する
コンテキスト(NSManagedObjectContext)を取得します。AppDelegate.swiftから取得できます。
これはCoreDataのハンドリングをするときの初期定型パターンになりそうですね。
func insertData()
{
    let entityName = "WorkerEntity"
    guard let appDelegate = UIApplication.shared.delegate as? AppDelegate else {
        fatalError("nilがあらわれた")
    }
    let context = appDelegate.persistentContainer.viewContext
}
続いて、NSEntityDescriptionクラスのインスタンスを生成します。エンティティにブチ込むためのまっさらな状態のものを生成します。
func insertData()
{
    let entityName = "WorkerEntity"
    guard let appDelegate = UIApplication.shared.delegate as? AppDelegate else {
        fatalError("nilがあらわれた")
    }
    let context = appDelegate.persistentContainer.viewContext
    let worker = NSEntityDescription.insertNewObject(forEntityName: entityName, into: context) as! WorkerEntity
}
書き込みたいデータを入れていく
前節で取得したNSEntityDescriptionクラスのインスタンスに対して書き込みたい値を入れていきます。
func insertData()
{
    let entityName = "WorkerEntity"
    guard let appDelegate = UIApplication.shared.delegate as? AppDelegate else {
        fatalError("nilがあらわれた")
    }
    let context = appDelegate.persistentContainer.viewContext
    let worker = NSEntityDescription.insertNewObject(forEntityName: entityName, into: context) as! WorkerEntity
    worker.id = UUID.init().uuidString
    worker.age = 30
    worker.name = "田中太郎"
    worker.attendance_time = Date()
    worker.height = 175.2
    worker.onduty = true
}
ここではベタ書きしてます。引数で与えるなどの対応は別途必要です。
データを書き込む
いよいよデータの書き込みです。コード自体は単純です。
NSEntityDescriptionクラスのインスタンスが保持しているコンテキストのsaveContextメソッドを呼び出します。
func insertData()
    {
        let entityName = "WorkerEntity"
        guard let appDelegate = UIApplication.shared.delegate as? AppDelegate else {
            fatalError("nilがあらわれた")
        }
        let context = appDelegate.persistentContainer.viewContext
        let worker = NSEntityDescription.insertNewObject(forEntityName: entityName, into: context) as! WorkerEntity
        worker.id = UUID.init().uuidString
        worker.age = 30
        worker.name = "田中太郎"
        worker.attendance_time = Date()
        worker.height = 175.2
        worker.onduty = true
        appDelegate.saveContext()
}なお、あるコンテキストに複数のエンティティを書き込むときでも、一通りエンティティを用意して最後にsaveContext()を一回実行するだけです。
寄り道:書き込みの処理の前に更新の有無を確認する
NSEntityDescriptionクラスのインスタンスにhasChangesプロパティがあります。これがtrueならば更新ありと判断します。
ならば、Attributeの値を変更してこのプロパティをfalseとすると、データの書き込みが行われないのでは!!
func insertData()
    {
        let entityName = "WorkerEntity"
        guard let appDelegate = UIApplication.shared.delegate as? AppDelegate else {
            fatalError("nilがあらわれた")
        }
        let context = appDelegate.persistentContainer.viewContext
        let worker = NSEntityDescription.insertNewObject(forEntityName: entityName, into: context) as! WorkerEntity
        worker.id = UUID.init().uuidString
        worker.age = 30
        worker.name = "田中太郎"
        worker.attendance_time = Date()
        worker.height = 175.2
        worker.onduty = true
        worker.hasChanges = false
        appDelegate.saveContext()
    }
Cannot assign to property: 'hasChanges' is a get-only property
なるほど…… 大船に乗ったつもりで任せてくれということですね。
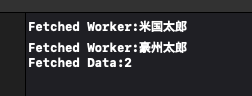
確認しよう
準備としてエンティティを3つ書き込みました。(日本太郎さん、米国太郎さん、豪州太郎さん)
うち2つのondutyをtrue、残りをfalseにしました。
(falseは日本太郎さん)
書き込めたはずなのでデータを読み出してみます。読み込みの処理は前回分のを使うので、エンティティが2つ取得できるはずです。
前回は空っぽが返ってきて残念だったですが、今回はどうかな?

修正1
let predicate = NSPredicate(format: "onduty = true")
Booleanにはシングルクォーテーションは不要でしたか。

修正2
もしや2回書き込んでいるので6つ記録されているのでは!?
取得数制限を外して確認してみます。
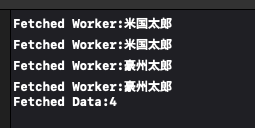
予想通り、(検索条件が入っているのでondutyがtrueの)4つが取得できました。
期せずして、アプリを再起動してもデータが残っていることも確認できました。
リトライ!
データの削除をまだ実装していないので、アプリを削除して再インストールで対応。
(≧∇≦)b
本日はここまで
データ取得時の条件の書き方はSQLのWhere句と同じと考えておいて良さそうですね。
次は登録したデータを削除してみます。いちいちアプリを削除していられないですからね〜
次を書きました